Hello Friends,
Let jump into future of development with VS Code,
This blog will help you to configure your first AL Language extension with D365 Business Central On-Prime Server.
Step 1 - Download and install D365 Business Central On-Prime Version.
You can download from this link

Step 2 - Download and install VS Code from link - https://code.visualstudio.com/download
After that, install latest AL Language extension in VS Code.

Step 3 - Make sure that you are able to run web client of D365 BC on-prime version and base URL setup correctly in configuration file.
D365 BC On-Prime Database and Server Instance Detail

Business Central Web client working properly.

Configure "Web Client Base URL" (PublicWebBaseUrl) in service to avoid error during publish vs code extension (Could not open the specified startup page. Please check that the server configuration key PublicWebBaseUrl has been properly set)

Step 4 - Start the VS Code and go to command plate to create new projects,
Write AL!GO on command plate to create new project.

Go to command palette from View >> Command Pallet (short cut key - Ctrl + Shift + P or F1)

write AL:Go! to create new AL Language extension project

Write the name of project at end.

Step 5 - System will default create the app.json and launch.json files, configure your op-prime business central service in lanuch.json file as shown in following snapshot.
Default files create with new project


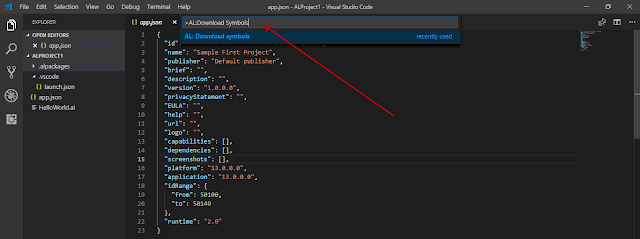
Step 6 - Download the base business central object (symbols) from link server in launch.json file.
Go to command plate and write AL!Download Symbols
After successfully download symbols, system will show following message.

Step 7 - Now the all setup completed and we are ready publish our first Hello World ! extension in on-prime D365 Business Central.
Press F5 publish your first extension on link server.


Very useful AL Command keyboard shortcut to remember for developer
==========================================================

Set enabled = false in setting and restart the service to take effect.

Let jump into future of development with VS Code,
This blog will help you to configure your first AL Language extension with D365 Business Central On-Prime Server.
Step 1 - Download and install D365 Business Central On-Prime Version.
You can download from this link

Step 2 - Download and install VS Code from link - https://code.visualstudio.com/download
After that, install latest AL Language extension in VS Code.

D365 BC On-Prime Database and Server Instance Detail

Business Central Web client working properly.

Configure "Web Client Base URL" (PublicWebBaseUrl) in service to avoid error during publish vs code extension (Could not open the specified startup page. Please check that the server configuration key PublicWebBaseUrl has been properly set)

Step 4 - Start the VS Code and go to command plate to create new projects,
Write AL!GO on command plate to create new project.

Go to command palette from View >> Command Pallet (short cut key - Ctrl + Shift + P or F1)

write AL:Go! to create new AL Language extension project

Write the name of project at end.

Step 5 - System will default create the app.json and launch.json files, configure your op-prime business central service in lanuch.json file as shown in following snapshot.
Default files create with new project

app.json file contain the detail about id, app name and object range details.

launch.json contain the detail about configure business central service detail to start your project with link service while pressing F5 / Ctrl + F5 and also require to download symbols.

Step 6 - Download the base business central object (symbols) from link server in launch.json file.
Go to command plate and write AL!Download Symbols

After successfully download symbols, system will show following message.

Step 7 - Now the all setup completed and we are ready publish our first Hello World ! extension in on-prime D365 Business Central.
Press F5 publish your first extension on link server.


Very useful AL Command keyboard shortcut to remember for developer
| Keyboard Shortcut | Action |
| Ctrl+Shift+P | Show All Commands |
| Ctrl+F7 | Download source code |
| Alt+A Alt+L | Go! Generates a HelloWorld project |
| Ctrl+Shift+B | Package |
| F5 | Publish |
| Ctrl+F5 | Publish without debugging |
| F6 | Publish and open the designer |
| Ctrl+F2 | Update the compiler used by the service tier(s) |
==========================================================
Tips - Step the "NetFx40_LegacySecurityPolicy" parameter to false in "Microsoft.Dynamics.Nav.Server.exe.config" file to avoid error in publish extension from VS Code.
You can find config file from path.

Set enabled = false in setting and restart the service to take effect.

I hope this blog help someone to setup there first extension development
If you need any help than write in comments.
Thank you for reading.
Keep Sharing...Keep Growing...
No comments:
Post a Comment