Well – you do have the “dependencyPublishingOption” in the launch.json, which has 3 options:
Consider the scenario where you have multiple applications within an environment, designated as the Parent app and Child App A.
Parent App: This application does not have any dependencies.
Child App A: This application depends on the Parent app.
Problem Statement:
When deploying the Parent app in Business Central, should you reinstall all dependent apps (like Child App A)? If so, how can this process be configured to occur automatically?
Solution:
Using the dependencyPublishingOption Property in launch.json
The dependencyPublishingOption property in the launch.json file is used to manage how dependent apps are handled during deployment. It offers three options:
Default: Rebuilds and publishes all dependent apps.
Ignore: Skips dependency publishing. Use this option cautiously, as it may break interdependent apps.
Strict: Fails the publishing process if there are any installed extensions dependent on the root folder. (Publishing will fail if the project has apps that not part of the workspace and depend on it) - Not applicable at in case where we are not using workspace option.
I like the default setting – something it takes a little longer to include all dependencies in the compile – but at least you’re checking all dependencies .. So that must be good . But, in some cases – especially in case of big apps with many objects – you might want to avoid unnecessary recompiles of dependent apps.. . (for big project we can use Ignore option in dependency publish to avoid more wait time)
Developers can now set the Title property on Error dialogs that are presented to the user to enrich issue description. On top of that, using the ErrorInfo object, developers can add up to three custom actions that will be displayed on the Error dialog to provide users with corrective actions. This can be achieved by calling the AddAction method on the ErrorInfo object, which can be passed to AL methods that support ErrorInfo such as Error, TestField, FieldError, and others.
The AddAction method accepts three parameters:
Caption: The text string that appears as the caption of the action in the error UI.
CodeunitID: The ID of the Codeunit to run when the action is initiated from the error UI. The codeunit should contain at least one global method to be called by the error action. The global method must have an ErrorInfo data type parameter for accepting the ErrorInfo object.
Method Name: The name of the method in the Codeunit, which is specified by the CodeunitID parameter, that you want to run for the action.
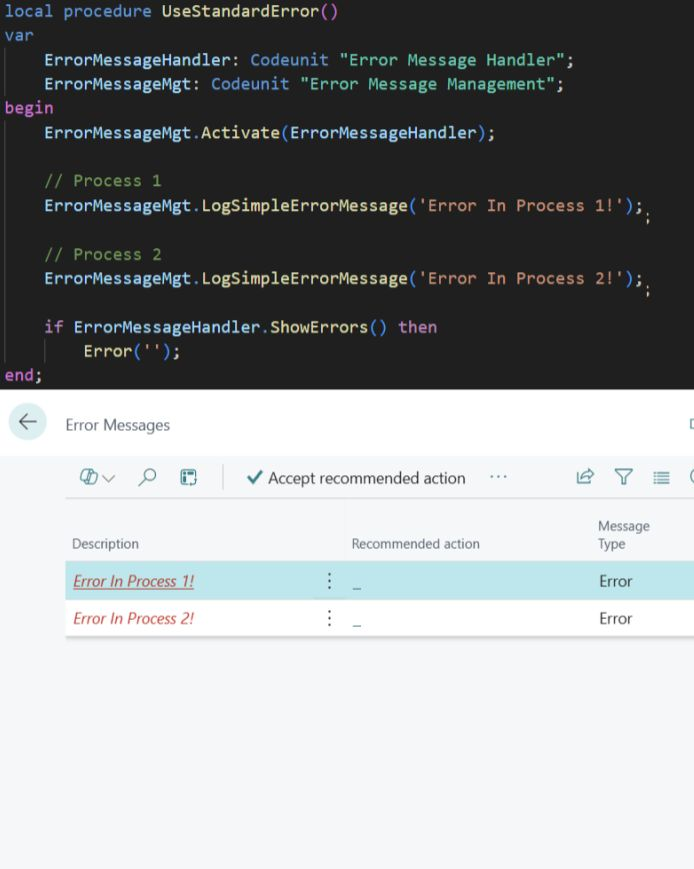
One more useful ErrorInfo variable we can use for provide ERROR Message with actions
we can have multiple actions on error message itself to open relevant setup or master page
this will very convenient for user to Navigate to correct page for fixing any issue
in above error there are two action showing Open Gen. Journal Template & Open Source Code Setup
this can possible using ErrorInfo variable
Sample Code:
codeunit75030INT_Sample_ErrorInfo
{
triggerOnRun()
var
GenJournalLine: Record"Gen. Journal Line";
ErrorInfo: ErrorInfo;
SameSourceCodeErr: Label'Journal Source Code %1 is same as Source Code set
for Purcase/Sales documents. This is not allowed when using deferrals.
If you want to use this journal for deferrals, please update Source Codes
on Gen Journal Template and generate line again.', Comment = '%1->Source Code';
OpenGenJournalTemplateDescTxt: Label'Open Gen. Journal Template page to
update Source code.';
OpenSourceCodeSetupDescTxt: Label'Open Source Code Setup page to check
Interfaces are a tricky concept that can be difficult to understand. In this article, you will learn how to use interfaces in Business Central step by step. By following an existing interface, you will understand how to implement it to create your own interfaces.
What Is An Interface
How To Use An Existing Interface
Example Setup and Test
How To Call An Interface
Summary
What Is An Interface
An Interface is a concept that defines a set of methods that codeunits can implement. It does not contain any logic or implementation itself but specifies methods that must be implemented by a codeunit that implements the interface.
Business Central interfaces were introduced in 2020. They are a way of extending Business Central functionality without the need for events. Their benefits are that they enable abstraction, decoupling, and scalability.
How To Use An Existing Interface
Interfaces can be a bit difficult to understand at first. I’ve found that the best way to learn how to create an interface is to use an existing one. This way, you will understand the concept and the steps to follow.
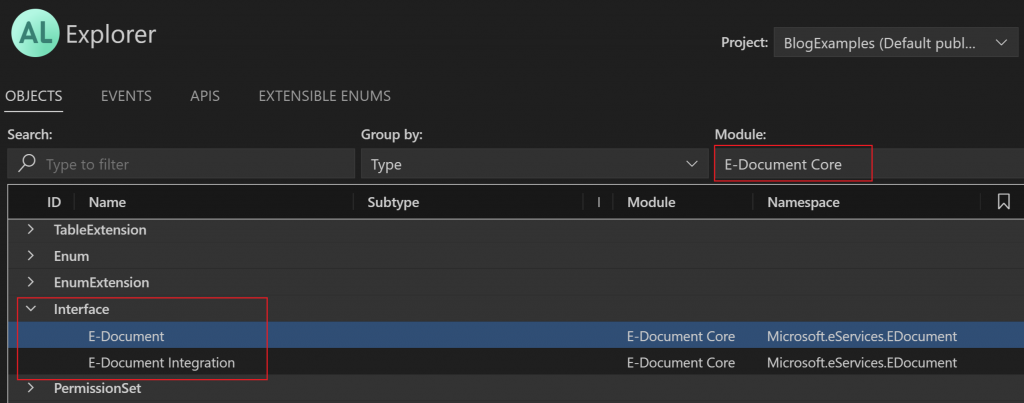
E-Document Core is a new application introduced in BC23. We will be using an interface in this application for this example. We will follow this link to implement the interface.
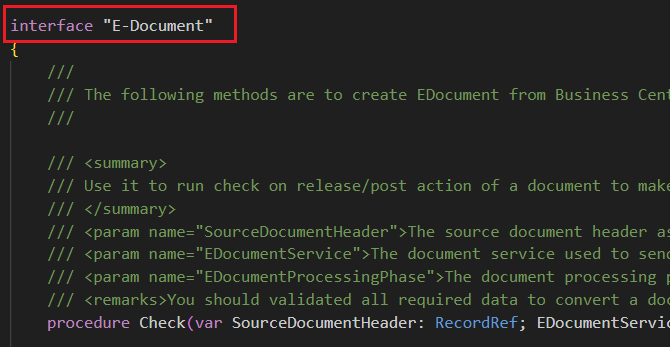
First, we need to identify the interface to implement. The “AL Explorer” can help with it. As you can see, there are two interfaces for this module. For simplicity, we will just implement the interface called “E-Document”.
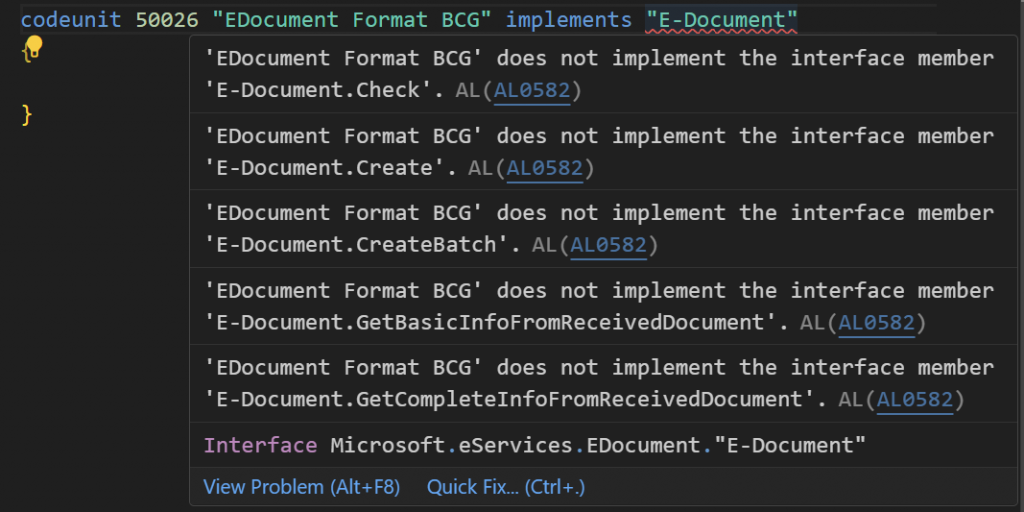
To use the interface we have to “implement” it. You can do it by creating a codeunit like this one. When you hover over “E-Document” you will see that all these methods are needed:
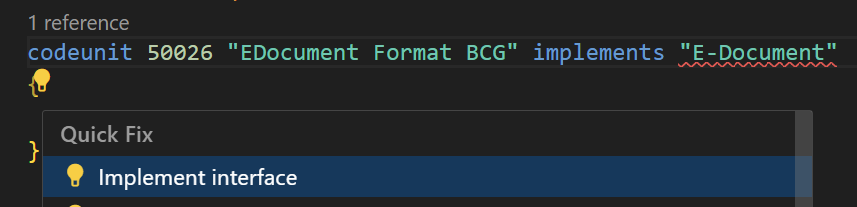
You can create them manually. However, you can do it automatically using the tooltip “Implement Interface”.
And all the procedures will be created empty for you.
If you drill down on “E-Document” you will be able to see the interface with all its methods.
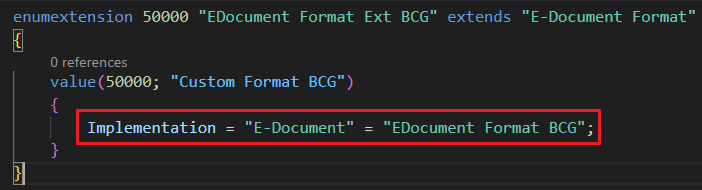
Finally, create an enumextension extending “E-Documet Format” and using our implementation.
The key here is that the enum can be extended with more values where each of them can have a completely different implementation. Giving the flexibility mentioned above.
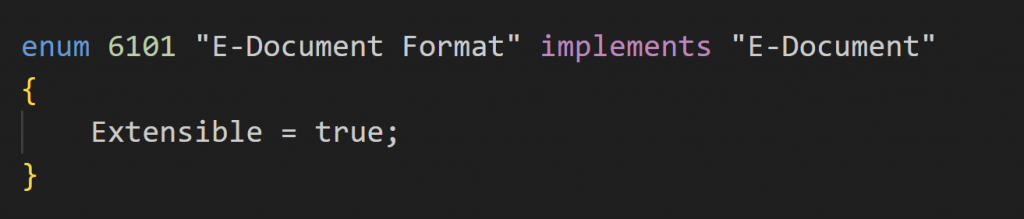
The enum “E-Document Format” just implements the interface “E-Document”
At this point, the foundation is established. But there is no logic in our implementation yet. Let’s create a simple example.
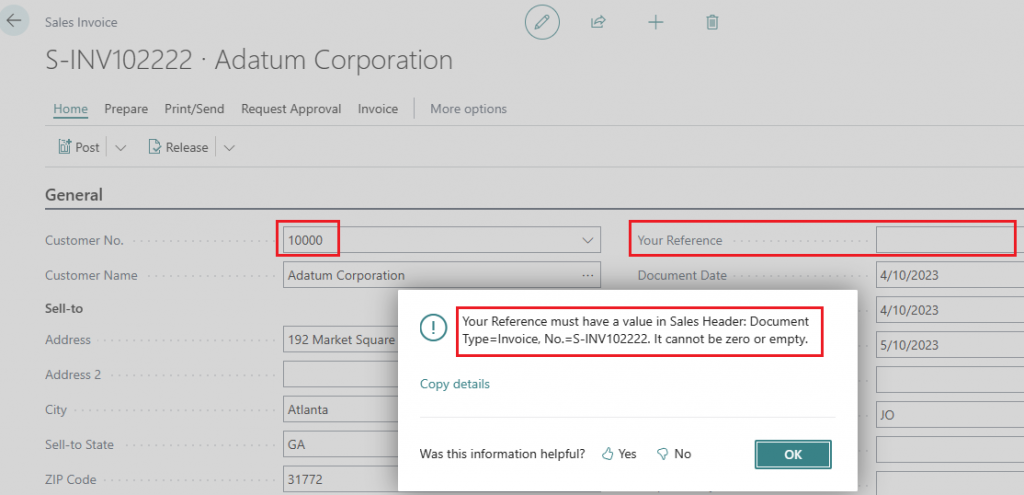
Inside the “Check” function we will do a Testfield in “Your Reference” field like this:
Example Setup And Test
Let’s set it up in Business Central. We have to follow 4 steps:
Create an E-Document Service
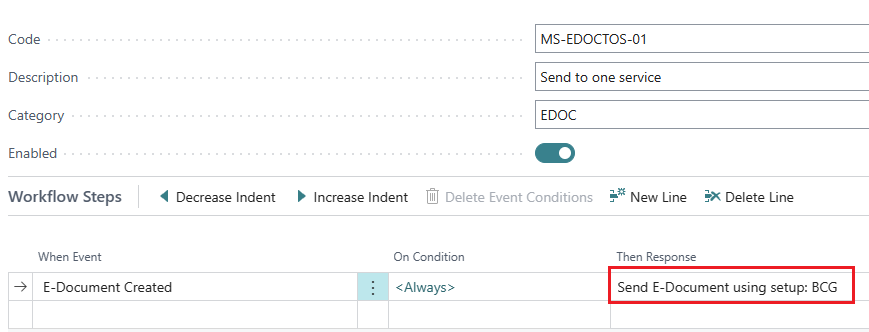
Create an E-Document Workflow
Create a Document Sending Profile
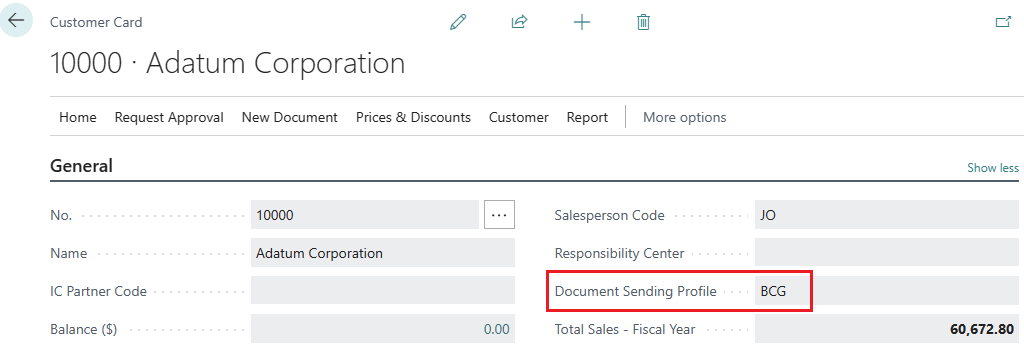
Assign the Document Sending Profile to the customer
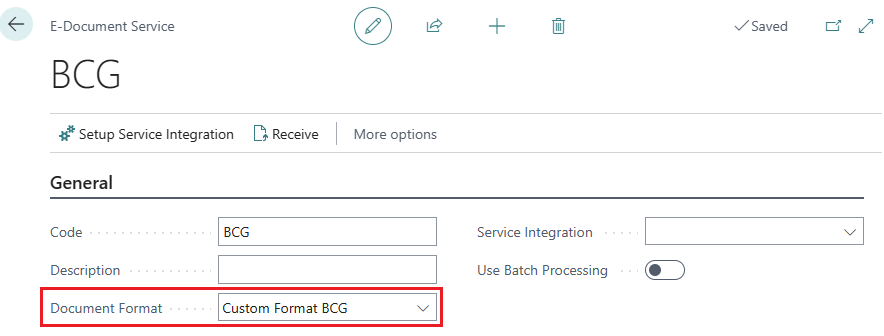
At this point, we can go ahead and create a new “E-Document Service” and select our enum value.
Create a very simple workflow like the following. Choosing the service just created.
Create a new Document Sending Profile by choosing the workflow just created:
Finally, assign it to the customer:
Now, when you try to release a sales document for this customer without “Your Reference” you will get an error:
This is just a simple example of an interface where we only created logic for one procedure.
How To Call An Interface
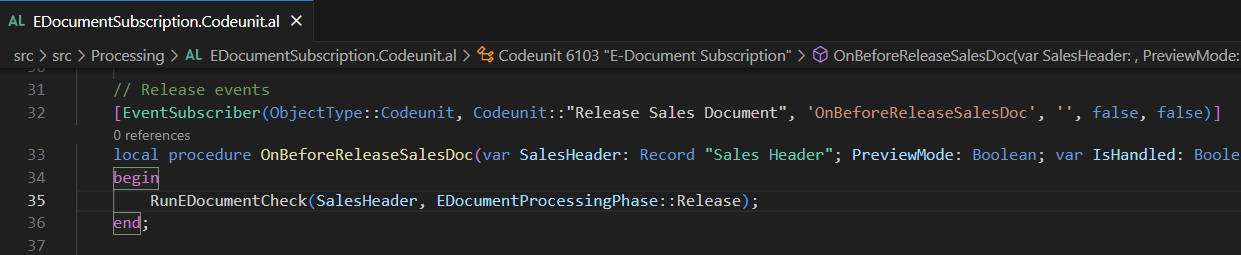
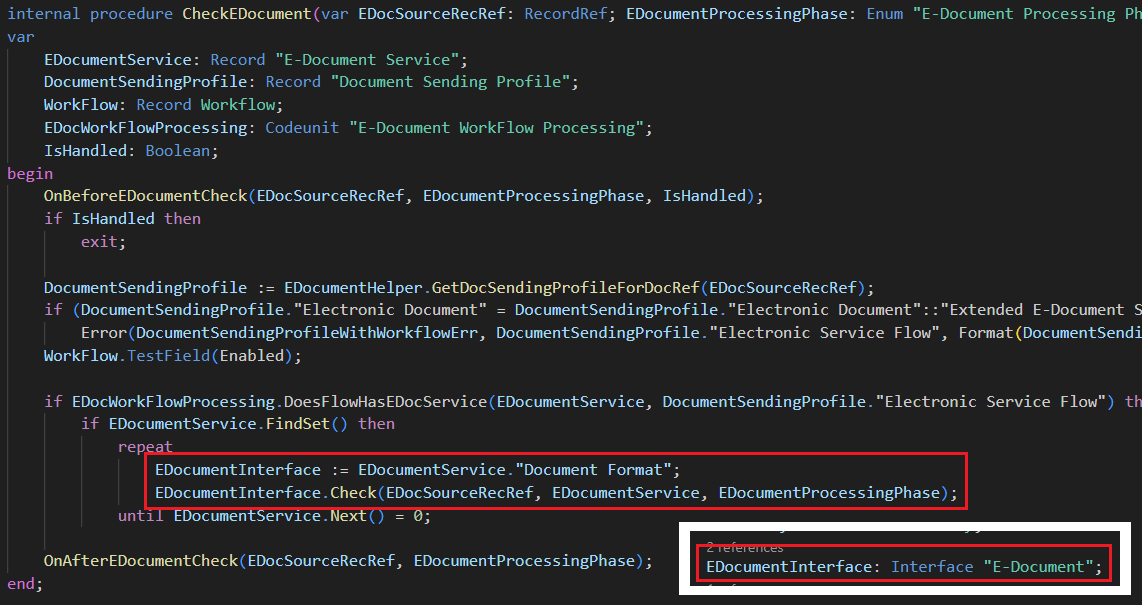
This interface, in particular, is called from this event in “E-Document Subscription” codeunit in E-Document core app:
We arrive at this procedure in which we can see that the interface is called with these two lines:
We can use Snapshot Debug for debugging in Production Environment in BC
SaaS
Snapshot debugging allows a delegated admin to record AL code that runs on the server, and once it has run, debug the recorded snapshot in Visual Studio Code. For a delegated admin to create and download a snapshot file that exists on the server on behalf of an end-user, the delegated admin must be part of the D365 Snapshot Debug permission group.
From Visual Studio Code, you start a snapshot by creating a snapshot configuration file. There are two template configurations for a snapshot, which are accessed by selecting Add Configuration in Visual Studio Code.
AL: Initialize a snapshot debugging session locally
AL: Initialize a snapshot debugging session on cloud
Below configuration added in launch.json
{
"name": "snapshotInitialize: Microsoft production cloud",
"type": "al",
"request": "snapshotInitialize",
"environmentType": "Production",
"environmentName": "production",
"tenant": "0cd33610-3443-4d21-a9a1-5b0f3ae1dc84",
"breakOnNext": "WebClient",
"userId": "BCADMIN",
"executionContext": "DebugAndProfile",
"snapshotVerbosity": "Full"
}
Useful shortcut for snapshot debug:
F7 Start a snapshot debugging session //Start
Opne BC Production Env and Process Tran. and Generate Error
Alt+F7 Finish a snapshot debugging session //Finish
Wait for Few min to system to download zip file in Snapshot folder
Shift+F7 List all available snapshots
//List of downloaded Snapshot - Click on Snapshot to start debug
PS: Status of a snapshot debugging session
Initialized – A request is issued and the server is waiting for the next session to be snapshot debugged based on the above rules.
Started – You have attached to an end-user session to snapshot debug.
Finished – When the snapshot debugging session has finished.
Downloaded – When the snapshot file is downloaded.
Business Central provide
facility to debug any of below session in Production or Sandbox environment
in On-Prime Version
- Any User Session
- Web Service Session (SOAP or REST)
- Job Queue Session
More details available on this blog:
https://arquiconsult.com/en/debug-attach/
https://yzhums.com/35078/
Finding and fixing bugs or errors is part of our daily tasks. This process may take a lot of time if we do not use the debugger and, even more, if the error occurs in a Web Service or in a Job Queue task.
In the older versions, the solution was to use the “Debug Next” functionality, but in Visual Studio Code that functionality is not present. No problem, we’ll use Attach.
To Enable debug we need User ID or Session ID
Setting
Description
userId
The GUID of the user on whose behalf a snapshot debugging will be started. For on-premises, this can also be the user name in user password authentication scenarios. The user must be able to start, or have a session type opened that is specified in the breakOnNext parameter. For more information, see JSON Files.
sessionId
A session ID for the user specified above in userId.
In request parameter we can setup either "launch" or "attach"
Below are few example of configuration to setup in launch.json:
1) For Debug any Web Service session in BC SaaS
{
"name": "Webservice_Debug",
"type": "al",
"request": "attach",
"environmentType": "Sandbox",
"environmentName": "AmericasDev",
"breakOnError": "All",
"tenant": "2474247c-aa32-48ba-b9a0-38e470449497",
"breakOnNext": "WebServiceClient",
"userId": "OAUTH_BC"
}
2) For Debug any User Session in BC On Prime
{
"name": "UserSessionDebg_Debug",
"type": "al",
"request": "attach",
"server": "http://10.110.98.168:8080/",
"serverInstance": "T002",
"port": 2749,
"authentication":"Windows",
"breakOnError": "All",
"breakOnNext": "WebClient",
"sessionId":9589
}
3) For Debug Job Queue Session in BC on prime
{
"name": "JobQueue_Debug",
"type": "al",
"request": "attach",
"server": "http://10.110.98.168:8080/",
"serverInstance": "T002",
"port": 2749,
"authentication":"Windows",
"breakOnError": "All",
"breakOnRecordWrite": "None",
"breakOnNext": "Background"
}
4) Debug webservice session in BC on prime
{
"name": "Webservice_Debug_OnPrime",
"type": "al",
"request": "attach",
"server": "http://10.110.98.168:8080/",
"serverInstance": "T002",
"port": 2749,
"breakOnError": "All",
"breakOnNext": "WebServiceClient",
"userId": "OAUTH_BC"
}
You can fine the Session ID in BC from front end.
Goto Help and Support and at bottom you can view session id
Similar you can get it from BC Admin center
For BC on Prime we can create page from table "Active Session" where you can see the session and instance name of us
Action Session Page AL Source:
page50571 "DEV Kill Session"
{
ApplicationArea = All;
Caption = 'Kill Sessions (Danger)';
Editable = true;
PageType = List;
SourceTable = "Active Session";
UsageCategory = Tasks;
InsertAllowed = false;
ModifyAllowed = false;
layout
{
area(Content)
{
repeater(Group)
{
field("User ID"; Rec."User ID")
{
ApplicationArea = All;
StyleExpr = StyleExp;
ToolTip = 'Specifies the value of the User ID field';
}
field("Session ID"; Rec."Session ID")
{
ApplicationArea = All;
StyleExpr = StyleExp;
ToolTip = 'Specifies the value of the Session ID field';
}
field("Login Datetime"; Rec."Login Datetime")
{
ApplicationArea = All;
StyleExpr = StyleExp;
ToolTip = 'Specifies the value of the Login Datetime field';
}
field("Client Type"; Rec."Client Type")
{
ApplicationArea = All;
StyleExpr = StyleExp;
ToolTip = 'Specifies the value of the Client Type field';

 . But, in some cases – especially in case of big apps with many objects – you might want to avoid unnecessary recompiles of dependent apps.. . (for big project we can use Ignore option in dependency publish to avoid more wait time)